
Introduction to the Guide
This guide is designed for Kuali Ready Admins, but also includes information on general user functionality. You can copy, revise, and remix the general information to develop end-user support and training resources that meet your specific needs. This is a living document and will be updated as needed.
For a faster start, check out the Admin Quick Start Guide
Product Overview
Kuali Ready is a cloud-based Continuity Planning application, designed by and for universities and colleges. Kuali Ready Admins are typically individuals responsible for institution-wide continuity planning. Kuali Ready Users are typically individuals responsible for departmental plans. When you first subscribe to Ready, the Admin must set up screens that contain information specific to the institution. Once the setup is complete, Users can begin creating plans. Users create plans by answering a series of questions. Plans can then be viewed online or saved and printed.
Support and Resources
Each subscriber institution designates a primary and secondary Ready Admin. These are the designated Admins for receiving Kuali messages, product updates, and important announcements, and for submitting Help Requests to Kuali. While you can assign the Admin role within Ready to multiple users, it’s important to designate the main contact people for your subscription relationship with Kuali.
The primary and secondary contacts at an institution will receive an invitation to the Kuali Ready Support Portal. That request will allow you to set a password and gain access to the site content. If you did not receive an invitation please reach out to the ready-support@kuali.co
Support Tickets
The primary and secondary contacts at your institution can each submit support tickets to Kuali. If the system is unusable or the majority of users cannot access it, please select ‘Urgent’ as the priority for your ticket. There are two ways to submit support tickets: Email or the Kuali Ready Support Portal.
- Email: Send an email describing the issue and impact to ready-support@kuali.co.
- Support Portal:
- Visit the Kuali Build Support Portal and sign in.
- Click on Submit a request
- Complete the request form. Note all fields with a red asterisk are required to submit the form.
- A note on Priority: please only use Urgent if your system is unusable and you require immediate attention (see our Kuali Service Level Agreement for details)
|
Impact |
Description | |
| Urgent |
|
|
| High |
|
|
| Normal |
|
Knowledge Base
Any user can search the Knowledge Base for information on product features and functions. It’s a great place to search for help before submitting a ticket. The Solutions Knowledge Base is updated with guides, sample content, and other helpful information.
Stay up to date with all the latest feature releases to Ready in Product Releases. Users can also utilize Our product board to see what we are planning and what is actively being worked.
Community
Access the Community feature to participate in general discussions or to create or vote on feature requests.
System Basics
This section of the guide describes system basics that apply to all users. You may wish to include this information in your end-user training and support materials.
Accessibility
Kuali Ready was designed with accessibility in mind. If you discover issues related to accessibility, please contact ready-support@kuali.co and we’ll work to resolve the issue as soon as possible.
Navigation
The system has 4 primary navigation components: (1) Banner, (2) Global Navigation, (3) Panel Navigation and the (4) Action Menu. All four are shown below.
Banner
- The top most part of the Kuali Ready application contains the Banner.
- Kuali Ready or Custom Name and Icon Link
- The Kuali Ready text at the top left side of the screen links to the Dashboard screen. Ready Admins can create a custom name for the tool in Setup. The custom name will replace Kuali Ready in the top left.
Profile Icon Menu
- The person icon menu at the upper right includes links to account settings and system sign-out.
Global Navigation
The upper left hand side of each screen in Kuali Ready contains the Global Navigation links. Global Navigation presents the same options on every screen you visit, based on your assigned user role.
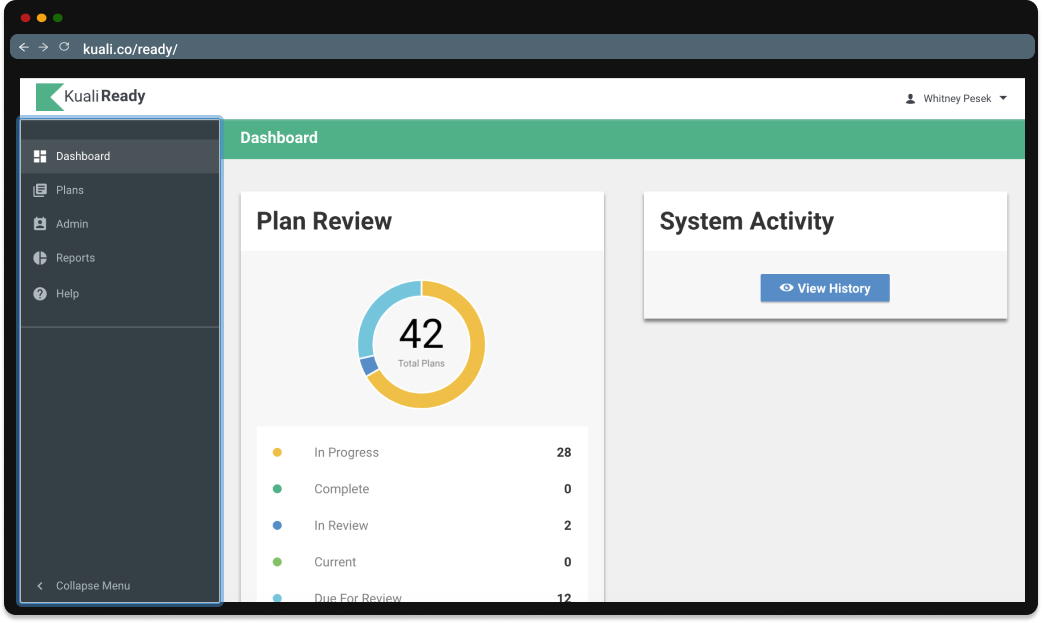
Dashboard Link
The Dashboard link loads the Admin dashboard which contains information to help the administrator see high level activity across all plans.
Plans Link
The Plans link loads the Plans screen, which contains a list of all the plans. This list gives a quick view of plan status, as well as options for viewing, editing and deleting plans, depending on your user role and plan permissions. This is also the screen where you can Start a New Plan.
Help Link
The Help link loads the main Help screen that includes a navigation menu with links to Help resources configured by the Ready Admin.
Admin Link
The Admin link loads the main Admin screen that includes a navigation menu with links to all administrator settings. It includes links to Setup and some of the frequently visited Admin resources.
Reports Link
The Reports link loads the menu for the canned reports accessible only to administrators.
Panel Navigation
Many screens provide navigation menus in the left panel below the Global Navigation . When you select a link that leads to a sub-menu, that menu will then appear in the left panel. Arrows next to navigation section headers indicate you can click to expand and collapse those sections. The Panel Navigation highlights your current location at all times.
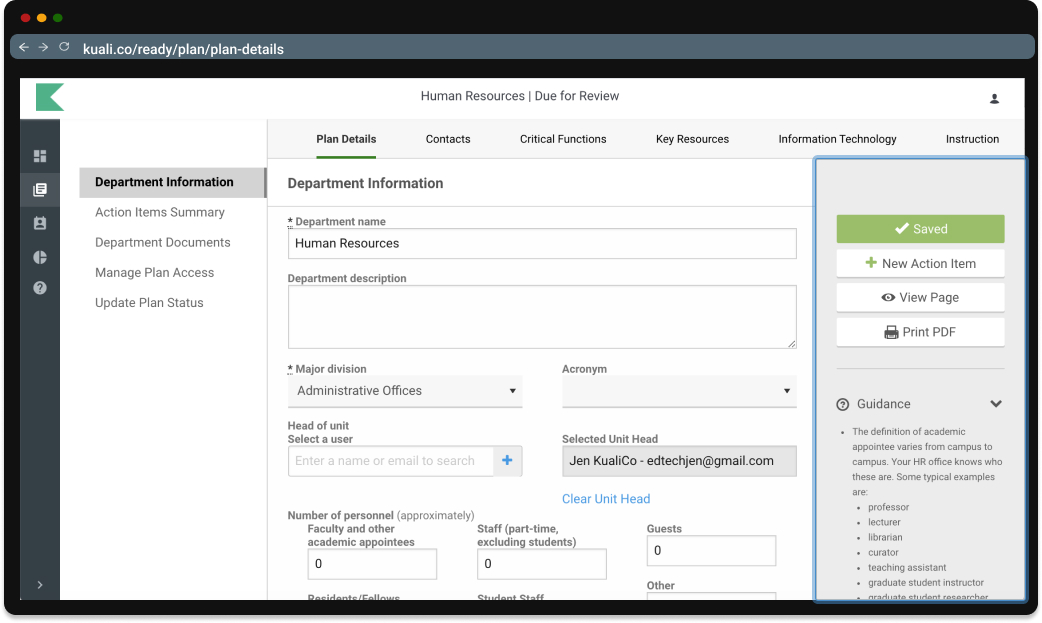
Edit and View Modes
Each page within a plan can be accessed in either an edit or view mode. Edit mode allows you to see all the fields that can be edited, make changes and save changes. Edit mode has an orange banner across the top. To switch to view mode click on the View Page link in the right hand side bar.
The view mode allows you to see a clean display of all content available without the chance of erroneously editing or saving content. View mode has a blue banner across the top.
Save
Several screens have open fields that allow you to edit content without explicitly selecting an Edit button. When you edit content on these screens, make sure you select the Save button before you leave the screen.
When there is no content that needs to be saved you will see the Saved button surrounded by green. When you have made changes that need to be saved, you will see the Save button surrounded by white. Click on the Save button to save all changes.
Clicking on the save button will also provide you with a notification in the upper portion of your screen to let you know you have successfully saved your changes. If you attempt to navigate away from the screen with unsaved changes you will be prompted to save them.
Guidance
Within the Action Menu you will find the Guidance content. This text contains helpful instructions and suggestions to guide users through the system and prompt them for quality responses. You can reveal the guidance panel by clicking on the Guidance link and you can hide the guidance panel by clicking on the Hide Guidance link. Your current selection will persist as you navigate between screens.
Action Menu
When working within a plan, the Action Menu exists on the right hand side. It contains different content depending on your location within a plan. Normally you will find the save function, the edit/view mode links, the ability to print the plan and the link to guidance if available.
General Features and Functions
These features and functions are applicable to all users. You may want to include this information in your end-user training and support materials.
Icons
Simple icons link to functions throughout the system. You can hover the mouse pointer over the icon to view the icon label.
- Edit - Select the pencil icon to edit content.
- View - Select the eye icon to view content
- Delete - Select the trash can icon to delete content.
- Archive - Select the file drawer icon to archive Action Items.
System Administration
Kuali Ready is designed to be administered by business users, not IT experts. The only time you may need IT assistance is when you initially set up your system if you will be using Shibboleth authentication.
Users
Ready Admins manage users from the Users screen in the Administration section. With Shibboleth authentication, user accounts are created and assigned the ‘User’ role the first time they log in. Admins can modify roles and turn access on and off in the Users screen in the Administration section
System Roles
There are three system roles in Ready and Admins can assign users to all three roles.
- Admin - We create the first Admin account at Kuali for the primary Admin. The primary Admin can then add other Admins. Admins have full access to system Setup, Reporting and all Plans. All Admins have the same permissions as the original primary Admin.
- User - Users do not have access to Admin Setup screens or Reports. All Users can create new plans and view and edit plans for which they have access. All Users can see the list of plans, but can only access plans where they have been explicitly invited.
- Global Viewer - The viewer role is a special role assigned to users who need to be able to view all plans. These users are not able to create or edit plans. You might assign this role to campus employees who only need to view plans during an adverse event.
User Account Creation - Direct Authentication
If you use Direct Authentication, you can manually create an account for a user. From the Users screen in the Administration section, select the Add New User button and complete the form.
Select the appropriate user Role. The user will automatically be notified via email that an account has been created for them.
User Account Moderation - Shibboleth
If you use Shibboleth, you are able to add users to your system in 2 ways:
- Share the login URL for Ready and have the user use their institutional credentials to access Ready. This will create an account for that user upon initial authentication. Each time the user authenticates, the system of record for your school will pass each attribute back to Ready. If there are changes in the system of record, those changes will be updated in Ready.
- Create a user in Ready for an individual. Key in the required fields and then you can choose to send an invite to the user or not. Note: Once you enter in and save the information for the new user, you cannot change it. Once that user authenticates, the system of record for your school will pass each attribute back to Ready. Any errors will be resolved upon that initial authentication.
User Account Moderation - Direct Authentication
If you use Direct Authentication, prospective users can select the Request Access button on the Login screen to request an account. Ready Admins can select a rule for account moderation on the System Parameters screen.
If you select Partial Moderation, requests submitted by users with the approved domains will automatically be approved and users will be assigned the User role. If you select Full Moderation, the Ready Admin must approve all account requests from the Users screen in the Administration section. Before requests are approved or denied, users who’ve submitted requests will be able to log in, but will not be able to view the plans list or create new plans.
A blue notification appears across the top of the Users screen when you have user accounts awaiting moderation. Select Awaiting Moderation from the drop-down menu to moderate account requests.
The Users screen presents a list of accounts awaiting moderation. Select the check icon for the account you wish to moderate, then update their status to Approved or Denied. Click on the trash icon to delete a request.
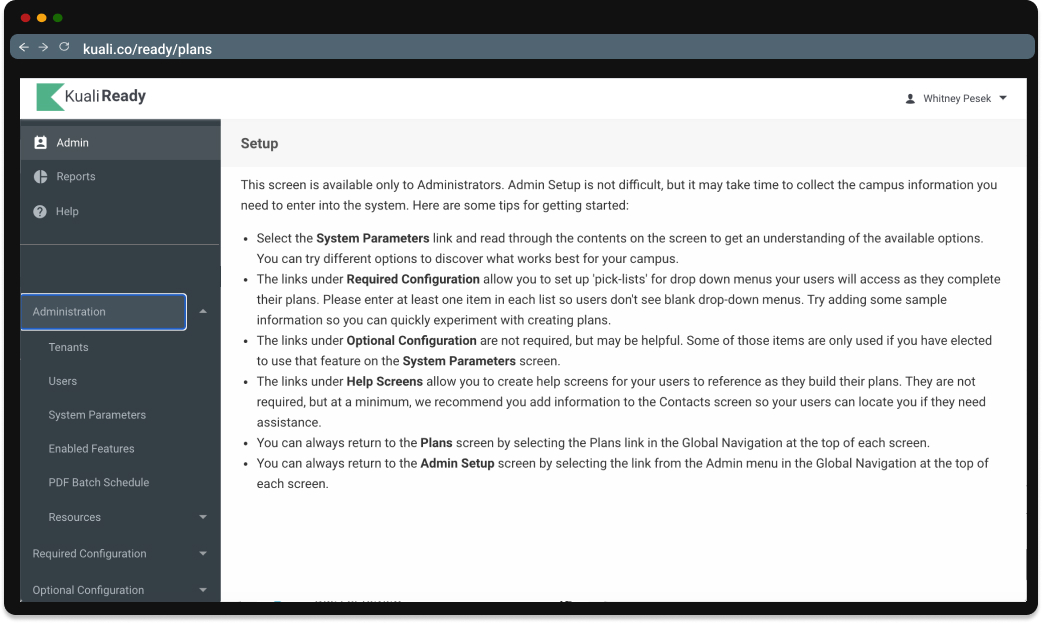
Required Configuration
Before users can create plans, the Ready Admin must enter content in the four sections listed under Required Configuration on the Administration section. These screens create lists users pick from as they build their plans. The screens include Buildings, Department Types, Major Divisions and Centrally Owned Applications. You don’t have to have all the information in all four sections, but you need something for them to select from. If you’re in a hurry to get started creating plans, you can start by adding the information in those screens that is necessary to the first plans you will create. (Technically the Major Divisions section is the only one that would prevent you from starting a plan, if there’s nothing entered there. If you don’t enter anything in the others, it just makes it confusing to see empty pick-lists in plans.)
Optional Configuration
The Optional Configuration screens include Instructional Departments, Acronyms, Levels of Criticality, Utilities, Dependencies, Skills, Staff Categories, Shifts and Recover Time Objectives. Within these screens pick-lists are populated to simplify Kuali Ready for your users who may not be familiar with Continuity Planning. They also provide consistency across information entered, so you can run accurate reports. You must add content to these lists before your users can create a complete plan. When you first get started, you may wish to enter a few things in each list and then create a practice plan so you understand how your lists are incorporated into plans.
Help Screens
The Help Screens include Contacts, Frequently Asked Questions and References. These screens appear to the users in the Global Navigation which you can access from any page. Use the Help Screens links to add content to these screens.
Further Assistance
Reach out to Ready's customer success team at rready-support@kuali.co
Ready offers services to help Admins set up and configure the application quickly and guide them through the application to get their teams educated on-the product and it's features.
Comments
0 comments
Please sign in to leave a comment.